FREE DISPLAY TEST
Display Test: Full Monitor Quality Test Suite
Trying to spot dead pixels, check color accuracy, or see if your monitor is working at its best? This browser-based suite puts your display through a full set of visual tests, including solid colors, gradients, sharpness, contrast, uniformity, and motion smear. Get instant feedback on your screen’s quality without installing anything.
What Does This Tool Do?
The Display Test suite is an all-in-one browser tool for checking your monitor's visual performance. It covers a wide range of display attributes: dead pixels, color gradients, gamma ramp, contrast, sharpness, solid color fills, uniformity, motion smear, response flash, and HDR clipping. Each of the ten steps is designed to reveal specific issues that can affect the quality of your experience, whether you are gaming, editing photos, or just browsing.
This tool helps you identify problems such as stuck or dead pixels, uneven backlighting, banding in gradients, poor contrast or sharpness, and slow response times. Unlike simple pixel tests, this suite gives you a detailed look at how well your monitor handles a full range of visual challenges. The progress dashboard tracks your journey through all ten tests, making sure you cover every important aspect.
Because this test runs in your browser, there’s no need to download or install anything. You get immediate results using real-world test patterns, similar to what professionals use to evaluate displays. While it does not match the precision of lab equipment, it’s practical for everyday users and enthusiasts who want to check or compare their monitors quickly.
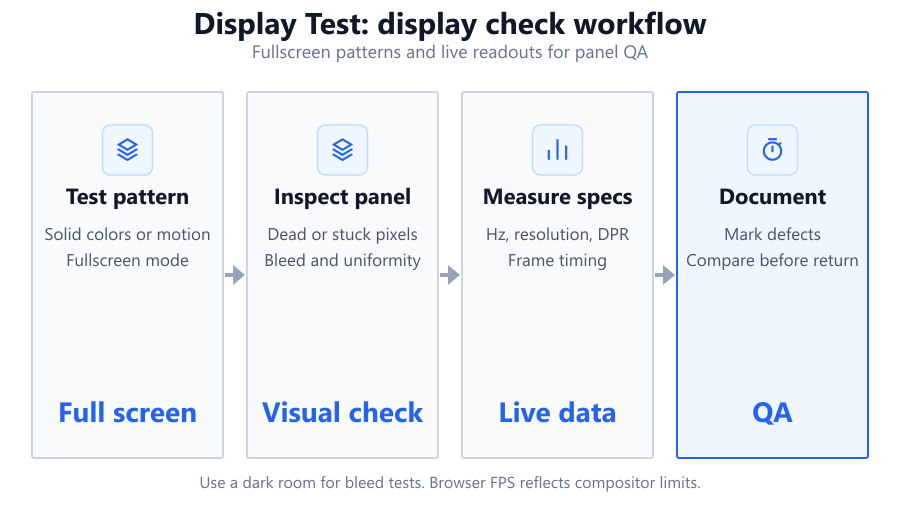
How to Use This Tool
Start with your monitor set to its native resolution and maximum brightness. Close other software that might interfere with display performance, like overlays or video players. Launch the Display Test tool in a modern browser such as Chrome, Edge, or Firefox. Each of the ten steps will present a unique test pattern or animation. The dashboard keeps track of your progress and lets you mark each section as reviewed.
Begin with the dead pixel test: look for any dots that do not change color. Gradients and gamma ramp check for smooth transitions and correct gamma response. Contrast and sharpness tests use text and patterns to reveal blurry edges or poor definition. Solid color fills and uniformity gray highlight backlight bleeding or color shifts. The motion smear demo and response flash tests simulate fast movement to show trailing or ghosting. HDR clipping, if available, checks for tone mapping on HDR-capable panels.
As you work through each section, follow the on-screen instructions. Use a clean, uncluttered room. For uniformity and color checks, dim the ambient light for best results. If you spot issues, jot down which test step revealed them. Mark each test complete as you go, so you don’t miss anything.
Understanding Your Results
Every test in this suite highlights a specific characteristic of your display. Here’s what to look for:
Dead Pixel Test: Black, white, red, green, and blue screens help you spot any pixels that are stuck or dead. A healthy monitor should display a completely uniform color with no tiny dots out of place.
Gradients and Gamma Ramp: These patterns show how smoothly your monitor transitions between shades. Banding or visible steps indicate limited color depth or poor processing. Ideally, gradients should look smooth, and the gamma ramp should appear as a continuous transition.
Contrast: High-contrast patterns and text help you see if your monitor handles dark and light details well. Washed-out blacks or clipped highlights mean you are missing detail in shadows or bright areas.
Sharpness: Text and fine lines should be crisp, not fuzzy. Blurriness or color fringes could point to incorrect resolution settings, poor focus, or panel limitations.
Color Fills and Uniformity: Solid colors and gray screens reveal uneven backlighting, color shifts, or dirty screen effects. Look for consistent brightness and hue across the screen.
Motion Smear and Response Flash: These demos reveal how quickly your monitor updates pixels. Blurring or ghosting is common on budget panels or with slow response times. Flashing patterns help you see if the display lags behind fast changes.
HDR Clipping: If your monitor supports HDR, this step shows whether you can see all levels of brightness detail. Missing steps mean your screen is clipping highlights or shadows.
The tool gives you visual feedback, not a numerical score. If you notice issues, compare them to another monitor or device for context. Some problems are minor and common, while others, like dead pixels or severe uniformity issues, may justify a warranty claim.
Common Problems This Helps Diagnose
This suite is designed to reveal most display defects you might encounter. Here are issues it can help you find:
Stuck or Dead Pixels: Small dots that do not change color when the screen does. These can be a few pixels or larger clusters, and are most obvious during solid color tests.
Backlight Bleed and Uniformity: Uneven lighting, especially at the edges or corners, shows up on gray or solid color screens. This is common on some IPS and VA panels, like budget Dell or LG displays.
Gradient Banding: If you see steps instead of smooth gradients, your monitor or GPU might be set to limited color depth, or the panel’s electronics are low quality. This often affects cheaper monitors.
Contrast Loss: Poor contrast means you lose detail in dark or bright scenes. This is especially noticeable on older TN panels or entry-level laptops.
Sharpness and Text Clarity: Blurry text or colored ghosting can result from incorrect resolution settings or low-quality scaling. This affects both desktop monitors and laptops.
Motion Blur and Ghosting: Fast-moving content, especially in the motion smear and response flash tests, highlights slow response times. Entry-level monitors and office displays like the Dell P series often show more blur than gaming models such as the ASUS VG series.
HDR Clipping: Failing to display all HDR levels means you are missing highlight or shadow detail. This is mostly relevant for modern gaming monitors or TVs with HDR support.
While some issues, like a single dead pixel, are minor, others, such as heavy uniformity problems, can be distracting for photo editing or gaming.
Examples and Scenarios
Scenario 1: Stuck Pixel on a New Monitor
You’ve just purchased a Dell S2721DGF for gaming. During the dead pixel test, you spot a tiny green dot that does not disappear on any color. This is a stuck pixel. If it’s in the center or bothers you during use, check your warranty. Many brands like Dell will allow a return if there are multiple dead or bright pixels.
Scenario 2: Banding in Gradients on a Budget Laptop
Your Lenovo IdeaPad shows banding in the gradient step. Instead of a smooth transition, you see visible steps. This is likely due to a low-quality 6-bit panel or limited color depth settings. Try enabling 8-bit color in your GPU control panel. If banding persists, it’s a hardware limitation.
Scenario 3: Backlight Bleed for Photo Editing
You use an LG 27UL500 for photo editing. In the uniformity gray test, you notice bright patches along the bottom edge. This is backlight bleed, common on budget IPS panels. It can be distracting in dark scenes. If severe, consider a higher-end model like the BenQ PD2700U.
Scenario 4: Ghosting in Fast Games
Your ASUS VG248QE is used for esports. In the motion smear demo, you see trailing shadows behind the moving object. This is ghosting, often caused by slow response time or incorrect overdrive settings. Adjust the monitor’s overdrive, or try a faster gaming model like the ViewSonic XG2431.
Scenario 5: HDR Clipping on a New TV
You connect a Samsung QN90B TV to your PC for HDR gaming. The HDR clipping step shows missing highlight steps. This means your TV is not displaying the full HDR range. Check your Windows and GPU HDR settings. If the problem remains, it may be a limitation of the TV’s tone mapping.
Scenario 6: Fuzzy Text on a MacBook with External Monitor
You connect your MacBook Air to an older HP 24-inch monitor. On the sharpness text test, letters look fuzzy and have color fringes. This is likely due to non-native resolution scaling. Set the monitor to its native resolution in macOS display settings to improve clarity.
Tips for Accurate Testing
Use your monitor’s native resolution and refresh rate for every test. Set brightness and contrast to typical viewing levels, not maximum, unless specifically checking for uniformity or HDR. Disable any display enhancements like dynamic contrast or vibrant color modes.
Test in a dimly lit room to avoid glare and reflections. Clean your screen with a microfiber cloth before starting, as dust can look like display defects. For color and uniformity tests, sit directly in front of the panel at a comfortable distance. Viewing angles can affect results, especially on VA and TN panels.
If using a laptop, plug it in for maximum performance. Ensure your browser is up to date, as older versions may render patterns incorrectly. Avoid running demanding apps in the background, as they can cause stuttering or inaccurate motion tests.
Remember that browser-based tests are limited by your system’s OS settings, browser rendering, and input lag. For the most reliable results, pair this tool with manual checks and, if needed, dedicated calibration hardware.
Browser vs Desktop Software
Browser-based tests are fast and convenient. They work on any device with a modern browser and require no installation. This makes them ideal for quick checks, comparing monitors in a store, or troubleshooting at home. The patterns and animations used are similar to those found in desktop calibration tools, but there are limitations.
Browsers cannot control your monitor or GPU directly. Tests that rely on frame timing, such as motion smear and response flash, are approximate. Your results can be affected by browser refresh rate caps, OS-level color profiles, or GPU scaling settings. For example, a 60Hz laptop screen or an outdated browser may not show motion artifacts as accurately as a hardware tool like the Datacolor SpyderX.
Desktop software can access system APIs for more precise measurements and calibration, including ICC profile management and hardware LUT adjustments. Some tools, like CalMAN or DisplayCAL, work with colorimeters to measure color accuracy and uniformity beyond what a browser can show. However, for most users, the Display Test suite provides enough information to spot issues and guide further troubleshooting.
Summary
The Display Test suite is your first stop for checking monitor quality. With ten focused steps and instant visual feedback, it covers the key issues that affect your experience: dead pixels, color consistency, sharpness, contrast, motion handling, and HDR. It works in any browser and requires no installation, making it accessible for all skill levels.
While browser-based testing cannot match the precision of lab-grade calibration tools, it’s effective for catching obvious defects and guiding your next steps. Use it when setting up a new monitor, diagnosing problems, or comparing displays before buying. For advanced calibration or color-critical work, consider pairing it with dedicated hardware or professional software. Either way, this tool helps you quickly understand and improve your viewing experience.
Frequently Asked Questions
How do I check for dead pixels on my monitor using this tool?
To check for dead pixels, use the dead pixel step in the suite. It cycles through full-screen solid colors: black, white, red, green, and blue. Carefully scan the screen for any dots or areas that do not change color with the background. Stuck pixels will usually remain one color, while dead pixels often appear black or white on every test. For best results, view the screen in a dark room and clean the panel beforehand to avoid confusing dust with pixel defects. Most dead pixels are permanent, but some stuck pixels may be fixed with gentle pressure or pixel refresher videos.
Can I use this tool to calibrate my monitor for photo editing?
This tool helps you check for issues like color banding, uniformity, and contrast, which are important for photo editing. However, it does not calibrate your monitor or create ICC color profiles. For accurate calibration, you’ll need a hardware colorimeter such as the X-Rite i1Display Pro or the Datacolor SpyderX, along with software like DisplayCAL. Use this suite to identify problems and to confirm your calibration by visually inspecting gradients and color fills, but rely on dedicated tools for true color accuracy.
Why do gradients look banded on my monitor?
Banded gradients are usually caused by limited color depth or poor processing. Many budget monitors use 6-bit panels with dithering, which can’t display all shades smoothly. If you see obvious steps in gradient patterns, check your GPU settings and make sure the display is set to 8-bit or higher color output. Some laptops and older monitors simply can’t render smooth gradients due to hardware limitations. If you need smooth transitions for design or photo work, consider upgrading to a monitor with a true 8-bit or 10-bit panel, such as the ASUS ProArt series.
What does the motion smear demo show?
The motion smear demo animates objects across the screen to reveal how quickly your monitor updates pixels. If you see long trails or blurred edges behind moving objects, your display may have a slow response time. This is common with older or budget panels, especially VA and some IPS types. Gaming monitors like the Acer Predator XB253Q tend to have faster response times and less smear. Browser-based motion tests are approximate, as they depend on your system’s refresh rate and browser performance, but they are good enough to spot major motion artifacts.
How accurate are browser-based display tests?
Browser-based tests are useful for quick checks and spotting obvious issues, but they are not as precise as desktop calibration tools or lab equipment. Factors like browser rendering, OS color management, and GPU settings can affect patterns and animations. Motion and response time tests, in particular, are estimates due to browser timing limitations. For most users, these tests are accurate enough to identify defects or major calibration problems. For professional color work or precise measurements, use a colorimeter and desktop software.
Can this tool help me diagnose backlight bleed or IPS glow?
Yes, the solid color fills and uniformity gray steps are designed to reveal backlight bleed and IPS glow. Display a full-screen gray or black pattern in a dark room. Backlight bleed appears as bright patches along the edges or corners, while IPS glow looks like a faint cloud that changes with your viewing angle. Most IPS monitors like the LG 27GL850 have some glow, but excessive bleed could be a defect. VA and TN panels are less prone to glow but may still show uneven lighting. Compare your screen to others to judge severity.
Why does text look fuzzy on my monitor?
Fuzzy or blurred text can be caused by running your monitor at a non-native resolution, incorrect scaling settings, or a low-quality panel. On the sharpness text test, letters should be crisp and clear. If not, check your display settings in Windows, macOS, or Linux and select the monitor’s native resolution. Some monitors, especially older models, use sub-pixel layouts that make text look less sharp. Adjusting ClearType in Windows or font smoothing in macOS can help improve clarity.
How do I interpret the HDR clipping test?
The HDR clipping test shows a series of boxes with increasing brightness. On a properly configured HDR monitor or TV, you should see distinct steps up to the highest level without merging or disappearing boxes. If you lose detail in highlights, your display may be clipping bright areas or not mapping HDR content correctly. Check your HDR settings in Windows or your GPU control panel. Some displays, even those marketed as HDR-ready, have limited HDR performance and may not show all steps.
Is this tool safe to use on any computer?
Yes, this is a browser-based tool and does not require any downloads or installations. It works on any modern browser and does not access your files or hardware beyond displaying test patterns. For best results, use it on a desktop monitor or laptop with no browser zoom applied. The tool does not make permanent changes to your system, so it’s safe for use in shops, offices, or at home.
Will this tool work on my phone or tablet?
The tool will load and run on most phones and tablets, but results may be less reliable due to auto-brightness, aggressive power saving, and touch-based interfaces. Mobile displays often use advanced processing or color enhancements that can mask issues like banding or uniformity. For basic checks or spotting obvious defects, it’s fine, but for serious testing, use a desktop or laptop with manual brightness controls. If you want to compare multiple devices, run the same suite on each one for reference.
Can I use this tool to compare two monitors side by side?
Absolutely. Open the tool in two browser windows, one on each monitor. Run through the ten steps and compare the results at each stage. Differences in color, sharpness, or response time are usually obvious, especially in the gradients and motion tests. Make sure both monitors are set to their native resolution and similar brightness for a fair comparison. This method is helpful when deciding between models like the Dell U2720Q and the ASUS VG27AQ.
Why do I see flickering or stutter in the motion tests?
Flickering or stuttering can be caused by low refresh rates, browser performance issues, or background applications using system resources. Some browsers limit animation frame rates or do not handle vsync reliably, especially on older hardware. Close unnecessary programs, update your browser, and make sure your display is set to its maximum refresh rate. If the problem persists on all monitors, it may be a browser or OS limitation rather than a display defect.
How can I reduce motion blur on my gaming monitor?
To reduce motion blur, use a monitor with a high refresh rate (at least 120Hz) and fast response time, such as the ViewSonic XG2431 or ASUS TUF Gaming VG259QM. Enable any built-in overdrive or motion blur reduction features, but avoid setting overdrive too high, as it can cause inverse ghosting. Make sure your GPU outputs frames at the same rate as your monitor’s refresh rate. Use this tool’s motion smear demo to fine-tune your settings and see the difference in real time.
Do I need to adjust my monitor's OSD settings before testing?
For accurate results, set your monitor to its default color mode or sRGB if available. Disable dynamic contrast, vivid color, or similar enhancements. Adjust brightness and contrast to comfortable levels, but avoid extreme settings unless you are checking for uniformity or HDR performance. If your monitor has a dedicated gaming or reading mode, switch to standard for testing. The goal is to see the panel’s native performance without digital processing interfering.
Can this tool detect issues caused by a bad HDMI or DisplayPort cable?
Indirectly, yes. If you see color artifacts, flickering, or missing signal during the tests, a faulty cable could be the cause. Solid color or gradient tests may show unexpected lines or color shifts if the connection is unstable. Try swapping cables or using a certified high-quality cable, especially for 4K or high-refresh-rate monitors. Brands like Cable Matters or Belkin are known for reliable cables. If problems vanish with a new cable, the original was likely at fault.
What should I do if I find a defect during testing?
If you discover a defect like a dead pixel, heavy backlight bleed, or severe banding, check your warranty and the manufacturer’s policy. Some brands, like Dell or LG, allow returns for multiple dead pixels or uniformity issues. Document the problem with photos or videos, and include your test results. If the issue is minor and outside warranty coverage, you may be able to live with it or use pixel-fixing tools for stuck pixels. For persistent problems, consider replacing the monitor with a higher-quality model or one with a better panel type.
Related Tools
Free tools to analyze, compare, and optimize your PC gaming performance
Dead Pixel Test
Test your monitor for dead, stuck or hot pixels using fullscreen color patterns. Free online dead pixel checker.
Use Tool →Backlight Bleed Test
Detect backlight bleeding, IPS glow and display uniformity issues using fullscreen dark patterns and display tests.
Use Tool →Color Screen Test
Display fullscreen color patterns for monitor testing, photography, calibration and display diagnostics.
Use Tool →Refresh Rate Test
Measure your monitor's actual refresh rate online. Test 60Hz, 120Hz, 144Hz, 165Hz, 240Hz and higher refresh rates instan
Use Tool →Popular Game System Requirements
Check if your PC meets the requirements for these popular games
Benchmark data from PassMark and publisher specs. Calculators run locally in your browser — we never upload your hardware info.